If you’re searching for clear, practical guidance on mastering outdoor exploration skills, you’re in the right place. Whether you’re planning your first backcountry trip or sharpening your wilderness survival strategies, this article is designed to give you straightforward, field-tested knowledge you can actually use. From understanding shift signals in changing environments to building confidence with eawodiz topographic map reading, we focus on the essential skills that make the difference between uncertainty and control outdoors.
Many guides skim the surface. Here, you’ll find step-by-step insights into trail navigation techniques, smart camp setup hacks, and foundational survival principles that work in real-world conditions—not just in theory. Our content draws from extensive hands-on outdoor experience, proven navigation methods, and practical survival applications to ensure accuracy and reliability.
By the end, you’ll have a clearer understanding of how to read the land, anticipate challenges, and move through the wilderness with confidence and purpose.
GPS feels like magic—until it doesn’t. Batteries die, signals vanish, and suddenly you’re in an episode of Survivor. That’s the problem.
A paper topographic map—a detailed map that uses contour lines (thin lines showing elevation changes) to turn flat paper into a 3D picture—never runs out of power. With eawodiz topographic map reading, you learn to spot ridges, valleys, saddles, and water sources at a glance.
Sure, some argue phones are faster. However, speed means nothing if the screen goes black. By contrast, mastering a map builds spatial awareness and confidence. In short, you’re not navigating—you’re understanding land.
Decoding the Map’s Legend: Your Key to the Terrain
A topographic map is more than paper—it’s a data sheet for the outdoors. With eawodiz topographic map reading, every line and color translates into real-world decisions on the trail.
Understanding Scale and Symbols
Map Scale: A 1:24,000 scale means one inch equals 24,000 inches in reality (about 2,000 feet). A 1:62,500 scale covers more area but with less detail—great for big-picture planning, not so great for spotting that tiny footbridge. Larger scale = more detail (think HD vs. standard definition).
The Color Code:
- Green = vegetation (dense forest or brush you’ll push through).
- Blue = water sources like rivers or springs (critical for refill points).
- Black = man-made features such as buildings or roads.
- Brown = contour lines showing elevation and slope steepness.
Essential Symbols:
- Dashed lines = trails.
- Blue dots = springs.
- Solid rectangles = buildings.
- Thick lines = highways; thin lines = dirt roads.
- Boundary lines mark park or property limits.
Magnetic Declination: This is the angle between true north and magnetic north. Ignore it, and your compass reading drifts off target. Find the declination diagram—usually near the legend—and adjust accordingly (a few degrees can mean miles off course).
Master the legend, and the terrain stops being a mystery.
The Language of the Land: Mastering Contour Lines
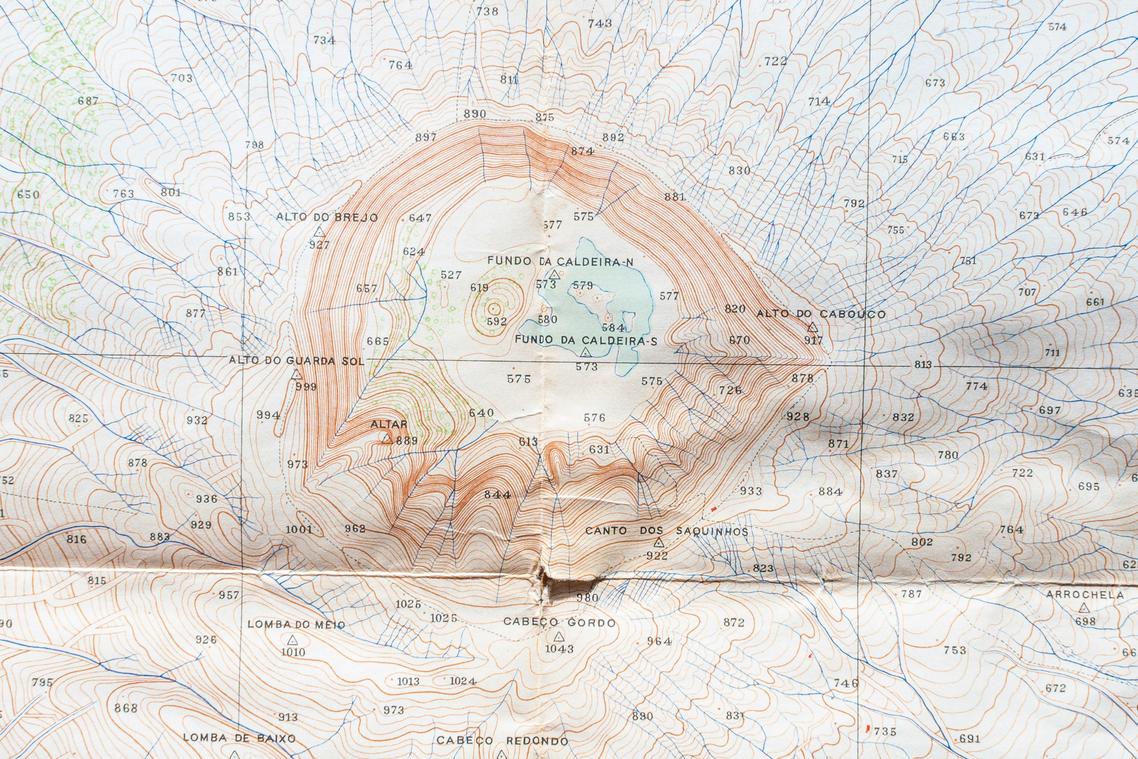
What Are Contour Lines?
Contour lines are lines on a map that connect points of equal elevation—meaning every point along that line sits at the same height above sea level. Think of them as the landscape’s fingerprint. Instead of guessing whether you’re hiking uphill or downhill, you can see it before you take a step. That’s the real benefit: fewer surprises, smarter route choices, and more energy saved for the adventure itself.
If you’ve ever watched a fantasy map unfold in a movie and wondered how explorers instantly “read” the terrain (very Lord of the Rings), this is how. They understand contour lines.
The Contour Interval
The contour interval is the vertical distance between each contour line. You’ll usually find it printed in the map legend. For example, if the interval is 20 feet, every line represents a 20-foot elevation change.
Why does this matter? Because it tells you how steep the terrain is. A 20-foot change over a short distance feels very different from 20 feet stretched across a football field. Pro tip: Always check the interval before planning your route—misreading it can mean underestimating a climb.
Reading Slope Steepness
- Lines far apart = gentle slope (easier hiking, less strain).
- Lines close together = steep terrain or cliffs (more effort, higher risk).
Mastering this skill during eawodiz topographic map reading helps you avoid exhausting ascents and identify safer paths.
Identifying Key Terrain Features
- Hills and Mountains: Concentric circles or ovals. The smallest inner loop marks the highest point.
- Valleys and Drainages: V- or U-shaped lines pointing uphill. Water flows the opposite direction.
- Ridges: V- or U-shapes pointing downhill—these often offer clearer walking routes.
- Saddles: An hourglass or figure-eight shape between two high points—ideal crossing spots.
Pair this knowledge with the compass skills every eawodiz explorer should practice, and you gain confidence, efficiency, and real independence in the wild.
From Map to Trail: Putting Your Knowledge into Practice
You’ve studied the map. You understand contour lines. But when you’re standing in the woods, pack on, boots muddy, do you actually KNOW where you are?
Step 1: Orienting Your Map
Orienting a map means aligning it with the real world so north on the paper matches north on the ground. Using a compass, rotate the map until the needle lines up with the map’s north-south grid. No compass? Use visible landmarks—a ridge line, a lake shore, even the sun’s position. Does that mountain on the horizon match the contour shape in front of you? If not, adjust. (Yes, it feels oddly satisfying when everything “clicks.”)
Step 2: Pinpointing Your Location (Triangulation)
Triangulation is the process of taking bearings from two or three known landmarks to determine your exact position. Spot a fire tower and a distinct peak. Take compass bearings to each, draw those lines on your map, and where they intersect—that’s you. Simple in theory. But have you ever tried it in wind or rain? Practice makes it second nature.
Step 3: Planning Your Route
Contour lines show elevation change; tightly packed lines mean steep terrain. Want the path of least resistance? Follow wider spacing. Look for valleys that may indicate water sources. Estimate hiking time by factoring elevation gain (a common rule: add time for every 1,000 feet climbed). Pro tip: fatigue hits harder on climbs than mileage alone suggests.
Real-world check-ins matter. Try “handrailing”—following a stream or ridge as a guide. Regularly compare visible terrain to your map. Are you still where you think you are? Mastering eawodiz topographic map reading turns uncertainty into confidence.
Navigate with Confidence on Your Next Adventure
Mastering scale, symbols, and contour lines is what turns a confusing sheet of paper into a living, breathing landscape. Scale tells you distance (for example, 1:24,000 means one inch equals 24,000 inches in real life). Symbols mark features like water sources or trailheads. And contour lines—those squiggly loops—show elevation and slope. Close lines mean steep terrain; wide spacing signals gentle ground (your calves will thank you).
Many hikers argue that GPS makes these skills outdated. After all, your phone shows a blinking dot. But batteries die. Signals fade. Screens crack at the worst possible moment. A paper map doesn’t crash.
That’s where eawodiz topographic map reading stands apart: it connects terrain awareness with practical field judgment, not just theory.
A map and compass aren’t old-school—they’re empowering. They replace uncertainty with clarity.
Pro tip: Take your map to a familiar trail and match visible ridges, streams, and hills to the page. Low stakes. High confidence.
Master the Terrain Before It Masters You
You came here to sharpen your navigation skills and feel more confident reading the land. Now you understand how contour lines, elevation markers, terrain features, and route planning work together to keep you on track instead of lost.
Getting turned around in the wild isn’t just frustrating — it can be dangerous. Misreading elevation, underestimating distance, or choosing the wrong descent point can cost you time, energy, and safety. The difference between a smooth trek and a survival situation often comes down to preparation.
That’s why practicing eawodiz topographic map reading before your next trip is critical. Apply what you’ve learned. Study your route in advance. Cross-check landmarks. Build the habit now so it’s automatic when conditions get tough.
If you’re serious about navigating smarter and exploring with confidence, start training today. Use proven field-tested techniques trusted by experienced outdoor explorers. Review your next trail map, plan your checkpoints, and put your skills to work before you step onto the path.
Your safety and confidence outdoors depend on what you do next — prepare well, navigate smart, and take control of your next adventure.